My Cup Overflows
This blog is about my life... It's good and I want to share it with you!
Monday, February 11, 2013
Mardi Gras - Bake A King Cake
Today, my girls and I decided to bake a king cake in anticipation of Mardi Gras. It was a great time baking with the kiddos and a wonderful opportunity to connect the history of the king cake to Epiphany. To read more about the story behind the King Cake click here.
I read all about making a king cake - it's basically a cinnamon pastry that is baked in a ring and a baby is hidden in the cake. It is iced with a glaze and topped with sugar colored the colors of Mardi Gras - purple gold and green.
We did our own version - Here is what you need
2 cans of cinnamon rolls with icing.
1 bundt pan
green, purple, and gold colored sugar
1 little baby for hiding in the cake
That's it!
My girls made the cinnamon rolls connect into a ring and we baked our cake in a bundt pan.
I turned it out onto our cake plate.
They iced it with the glace that came with the rolls and we sprinkled them with the Mardi Gras colors.
It was so easy - they were able to do this without much help from me, and it looks great.
The last step was hiding the baby in the cake - which we did by making a tiny cut near the bottom of the cake and my big girl popped it in.
She will take this cake to school with her tomorrow to share with her friends.
Wednesday, February 6, 2013
Pinterest steal
I think I stole this idea off of Pinterest. If not I don't remember where it came from but it's not original! I cannot take credit. However it's perfect.

I used a silverware divider bought from the dollar tree to hold the contents of my children's toothbrush drawer- genius- huh? I wrote their names with a sharpie to delegate where they go and voila- simple organization!

Now what do I do with all of this stuff?

- Posted using BlogPress from my iPhone
I used a silverware divider bought from the dollar tree to hold the contents of my children's toothbrush drawer- genius- huh? I wrote their names with a sharpie to delegate where they go and voila- simple organization!
Now what do I do with all of this stuff?
- Posted using BlogPress from my iPhone
Tuesday, February 5, 2013
Chinese New Year
Have you ever celebrated the Chinese New Year? Well this was our first time, but we had a blast! There are lots of fun activities and crafts to do. AND if I had planned better, we would have eaten chinese food - or at least had a fortune cookie. However, I feel like we did it up right and learned a little in the process! Here is how we celebrated.
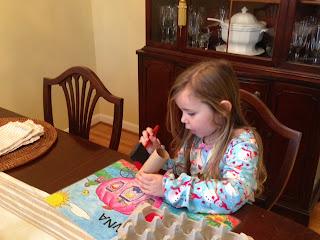
First we made a chinese firecracker. My baby girl painted a toilet paper roll red and we intended to draw chinese symbols on it with a gold paint pen, however, we ended up just with a red toilet paper roll - yikes. Still fun - painting is always a hit with a four year old!
Our next activity was to make chinese lanterns. We simply followed the tutorial here. It was a great cutting exercise for my girl. And since C is for Cutting and China... we were Cool!
The last activity was a snake exercise - since this is the year of the snake. I found a mask template here. Printed it, and stapled ribbon to it. We acted like snakes crawling around on our bellies, and made lots of ssssssssssilly sssssssssssssnake sssssssssssounds.
I also had a ssssssspiral sssssssnake exercisssssssssse (what? Too much?) for her to practice her cutting again.
Throw in a little google images on the ipad - and our celebration was a hit. I should also add that we did several countdowns (like you would for the new year - not sure if the chinese count it down, but hey... it was fun.) Practicing counting down from 5 then from 10. It was a good exercise for her and she had a blast! Like I said, next celebration we plan to have a little chinese food, and maybe some chop sticks :)
Monday, February 4, 2013
Fostering Creativity with Kids
Today I am going to share some tips on fostering creativity with your children through painting. You may want to be prepared to take notes - as the information I am going to share will undoubtedly be invaluable.
Step 1: Be sure you have the right supplies.
Step 2: Make sure you offer a variety of colors.
Step 3: Find a clean place where their art can dry and they can pick their favorites to be displayed.
Step 4: ALWAYS create a neat and serene environment to allow their creativity to bloom.
Hope you have gleaned much information and wisdom from this blog!
After all, I am here to help!
Step 1: Be sure you have the right supplies.
 |
| Egg Crate and Q Tips - Cannot Go Wrong! |
Step 2: Make sure you offer a variety of colors.
 |
| We literally own Red, Yellow, and Blue Paint - All others get mixed from those! |
Step 3: Find a clean place where their art can dry and they can pick their favorites to be displayed.
 |
| Yes that is a double frame with only one picture, and peppermint soap - just keeping it real! |
Step 4: ALWAYS create a neat and serene environment to allow their creativity to bloom.
 |
| Panorama is my favorite thing on my IPhone! |
Hope you have gleaned much information and wisdom from this blog!
After all, I am here to help!
Saturday, February 2, 2013
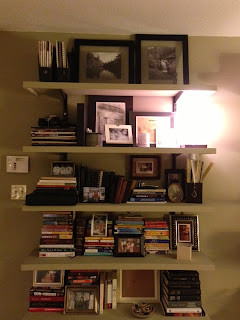
My Saturday Project: Bookshelves
They are a simple structure that my husband built, and we painted the same color as our walls so they would blend in. I, once again, got on pinterest to get inspired by some bookshelf ideas. What really struck me, though was I wanted to display some of my favorite things, and of course it meet our storage needs! So, here is what we came up with. A beautiful combination of things we love, our favorite books and pictures that are special to us! We are pleased! Hope you agree!
 |
Friday, February 1, 2013
Happy Ground Hog Day!
Have you ever tried to find snacks to celebrate Ground Hog Day? It's kind of difficult! I went to my trusty pinterest and found nothing, so I went surfing and found a couple of ideas that I pinned. But as pinterest often does, it sparked my creative side and I used a combination of the ideas to come up with these:
They are shadow cookies. I used my famous 4 ingredient cookies recipe (recipe below)- which in this case only have 3 ingredients, and combined the yellow cookies and chocolate cookies to make the "shadow" cookies.
 |
| Picture quality is lacking but you get the idea! |
Voila - a cute sweet treat to celebrate Ground Hog Day!
Enjoy!
Oops! totally forgot the recipe!
1. 1 box of cake mix (you pick the flavor)
2. 1/2 cup of oil
3. 2 eggs
Mix - scoop out into small spoonfuls - bake at 350 for about 10 minutes. - SUPER SIMPLE
In this case, I used one yellow cake mix and one chocolate cake mix.
Monday, January 28, 2013
The Letter C - Introduction - sort of
 |
Subscribe to:
Comments (Atom)


